Embarking on DIY Bathroom Projects might seem daunting, but with the right guidance, even beginners can achieve stunning results. Whether you’re dreaming of a complete bathroom renovation or just looking to spruce up your space with some budget-friendly fixes, we’ve got you covered. This post will delve into a plethora of innovative ideas, from choosing the right theme and gathering essential tools to mastering the art of DIY bathroom decor. Imagine installing floating shelves for extra storage, creating a budget bathroom makeover that will leave your wallet happy, or even tiling your bathroom floor like a pro. Excited to transform your bathroom into a sanctuary that blends style and functionality? Let’s dive in and turn your vision into reality!
Choosing the Right Theme for Your DIY Bathroom
When embarking on a DIY bathroom decor journey, choosing the right theme sets the foundation for a cohesive and visually appealing space. A theme will guide your design choices and provide a clear direction, simplifying decisions about colors, materials, and fixtures. Here are some bathroom renovation ideas to consider:
Popular Bathroom Themes
-
Modern Minimalist
- Clean lines, simple fixtures
- Neutral color palette
- Functional and clutter-free
-
Rustic Charm
- Wood accents, vintage fixtures
- Warm, earthy tones
- Incorporation of natural elements
-
Coastal Retreat
- Light blues, white, sandy beiges
- Seashell or nautical decor
- Relaxing and airy atmosphere
-
Vintage Glamour
- Antique mirrors, clawfoot tubs
- Ornate details, gold accents
- Rich, luxurious colors
Key Considerations for Theme Selection
| Factor | Details |
|---|---|
| Personal Taste | Choose a theme that reflects your personality. |
| Bathroom Size | Certain themes like minimalist work better in small spaces. |
| Budget | Some themes may require more expensive materials. |
| Existing Fixtures | Consider what you already have to minimize costs. |
Budget Bathroom Makeover Tips
- Repaint Walls: One of the easiest and most cost-effective ways to align your bathroom with your chosen theme is through a fresh coat of paint. Opt for colors that fit your theme’s palette.
- Accessorize Smartly: Even small accessories like soap dispensers and towels can significantly impact your bathroom’s theme without breaking the bank.
- Repurpose Existing Items: Use what you have creatively to keep costs low while maintaining thematic consistency.
Choosing the right theme can transform a mundane bathroom into a stylish retreat. By paying attention to your personal style, bathroom size, buget, and existing fixtures, you can create a space that feels both cohesive and uniquely yours. If positioned well, these choices can elevate your budget bathroom makeover to new heights. Happy renovating!
Essential Tools and Materials for Bathroom Projects
When embarking on a bathroom renovation, having the right tools and materials can make all the difference. Here’s a handy guide to ensure you’re well-prepared.
Must-Have Tools:
- Measuring Tape: Accurate measurements are crucial for any renovation task.
- Level: Ensure surfaces and fixtures are even.
- Cordless Drill: Versatile and essential for various tasks.
- Utility Knife: Ideal for cutting drywall, caulking, and other materials.
- Tile Cutter: Necessary for fitting tiles perfectly.
- Caulking Gun: A must for sealing tiles, fixtures, and other areas.
Essential Materials:
- Paint and Primer: Opt for moisture-resistant varieties.
- Tiles: Ceramic or porcelain tiles are durable and waterproof.
- Grout and Sealant: For a professional finish and durability.
- Floating Shelves: Perfect for adding storage without clutter.
- Vanity Supplies: From new handles to a fresh coat of paint, these elements can transform an old vanity.
Comparison Table of Key Tools and Materials
| Tool/Material | Purpose | Tips |
|---|---|---|
| Measuring Tape | Accurate measuring of spaces and items | Double-check measurements |
| Level | Ensure surfaces and installations are level | Use on all major installs |
| Cordless Drill | Drilling and screwing tasks | Keep extra batteries |
| Utility Knife | Cutting drywall, plastic, etc. | Keep blades sharp for clean cuts |
| Tile Cutter | Cutting tiles to size | Measure tiles before cutting |
| Caulking Gun | Sealing joints and fixtures | Use smooth, even strokes |
| Paint and Primer | Painting walls and surfaces | Use moisture-resistant products |
| Tiles | Covering floors and walls | Choose high-quality, non-slip tiles |
| Grout and Sealant | Filling tile gaps and sealing surfaces | Ensure you seal all exposed edges |
| Floating Shelves | Additional storage space | Use anchors for increased stability |
| Vanity Supplies | Upgrading existing vanities | Match new elements with bathroom theme |
Incorporating these essential tools and materials into your DIY bathroom decor projects can elevate the quality and longevity of your work, no matter your skill level.
Having the appropriate tools not only streamlines the process but also ensures you meet your renovation goals efficiently. With these budget bathroom makeover necessities, you’ll be set for any task that comes your way.

Step-by-Step Guide to Painting Your Bathroom Walls
Painting your bathroom walls can transform the space and bring a fresh look to one of the most used rooms in your home. Here’s a comprehensive guide to help you through the process:
Gathering the Essential Tools and Materials
Before you start painting, you’ll need:
- Painter’s tape
- Drop cloths
- Primer
- High-quality bathroom paint
- Paint rollers and brushes
- Paint tray
- Ladder
Preparing the Room
- Clear the Area: Remove all items from the walls, including mirrors, pictures, and shelves. Cover fixtures and the floor with drop cloths.
- Clean the Walls: Use a mild detergent to wash the walls. This eliminates grime and ensures better adhesion.
- Repair and Sand: Fill in any holes or cracks with spackle and sand them smooth after drying.
- Tape Off Areas: Use painter’s tape to protect trim, windows, and edges.
Applying the Primer
Priming is essential to ensure your paint sticks well and lasts longer, especially in a moisture-rich environment like a bathroom.
- Choose a high-quality primer: Opt for mold-resistant primer specifically designed for bathrooms.
- Apply the primer: Use a roller for large areas and a brush for corners and edges. Allow it to dry completely according to the manufacturer’s instructions.
Painting the Walls
Here comes the fun part—transforming your bathroom with its new color.
- Start with the edges: Use a brush to cut in along trim, corners, and ceiling lines.
- Roll on the Paint: For the larger wall areas, a roller can save you tons of time. Roll in a "W" pattern to avoid streaks and ensure even coverage.
- Apply Multiple Coats: Depending on the color change, you might need two or more coats. Allow the first coat to dry completely before applying the next.
| Tool | Purpose |
|---|---|
| Painter’s Tape | Protect trim and edges |
| Drop Cloths | Protect floors and fixtures |
| Primer | Helps the paint adhere better and last longer |
| Rollers & Brushes | Apply paint evenly |
Adding the Finishing Touches
After the paint has dried:
- Remove Painter’s Tape: Do this carefully to avoid peeling off any new paint.
- Touch Up: If you notice any spots or drips, touch them up with a small brush.
With these steps, you can give your bathroom a new, vibrant look. By following this Budget bathroom makeover, you’ll create a space you’ll love without breaking the bank. So, grab your brushes and get started on this exciting home improvement journey. Happy painting!
Installing Floating Shelves for Extra Storage
When it comes to elevating the functionality and aesthetics of your bathroom, installing floating shelves for extra storage is a game-changer. These shelves not only create additional storage space but also add a modern and open look to your bathroom. Here are some essential tips to successfully install floating shelves and optimize your space:
Why Floating Shelves?
Floating shelves provide a sleek and contemporary storage solution that can seamlessly blend with any bathroom decor. Whether you’re working on a budget bathroom makeover or simply looking to declutter, floating shelves are both functional and stylish.
Materials and Tools
Before diving into the installation, ensure you have the following essential tools and materials:
- Shelves: Choose the right size and material for your bathroom theme.
- Brackets: Invisible or L-shaped brackets for support.
- Drill: For making precise holes.
- Level: To ensure the shelves are perfectly horizontal.
- Screws and Anchors: For secure installation.
Installation Steps
Follow these straightforward steps to install your floating shelves:
- Measure and Mark: Determine the height and spacing between the shelves. Use a pencil to mark the spots on the wall.
-
Install Brackets:
- Use the level to ensure precise alignment.
- Drill holes and insert anchors for extra stability.
- Secure the brackets with screws.
- Mount Shelves: Place the shelves onto the brackets. Ensure they rest securely.
- Final Adjustments: Use the level again to confirm the shelves are even.
Practical Tips
- Utilize Corners: Corners are often underutilized. Installing shelves in corners can optimize space.
- Mix Storage and Decor: Combine storage with decorative elements such as plants, candles, or artwork.
- Vary Shelf Heights: Varying heights add visual interest and cater to different storage needs.
Tables for Quick Reference
To further solidify your understanding, here’s a quick reference table for materials and steps:
| Item | Purpose |
|---|---|
| Shelves | Storage surface |
| Brackets | Support structure |
| Drill | Create mounting holes |
| Level | Ensure shelves are horizontal |
| Screws/Anchors | Secure the shelves onto the wall |
| Step | Description |
|---|---|
| Measure and Mark | Determine and mark shelf positions |
| Install Brackets | Align, drill holes, secure brackets with screws |
| Mount Shelves | Place shelves on brackets, ensure stability |
| Final Adjustments | Check alignment with the level |
By following these guidelines, you can effortlessly upgrade your bathroom storage while keeping it stylish and functional. Incorporating bathroom renovation ideas like these floating shelves can make a significant difference, even for beginners engaged in a full-scale or DIY bathroom decor.
Creating a Budget-Friendly Vanity Makeover
Transforming your bathroom doesn’t require a hefty budget. In fact, creating a budget-friendly vanity makeover can be both satisfying and cost-effective. Here’s how to refresh your vanity while minimizing expenses.
Steps for an Affordable Vanity Makeover:
- Revamp the Cabinet Doors: A fresh coat of paint can do wonders. Choose a color that complements your bathroom theme and ensure you prep the surface properly.
- New Hardware: Replacing old knobs and handles with modern, stylish hardware can instantly update the look. Affordable options can be found online or at your local home improvement store.
- Countertop Overlays: Instead of replacing your entire countertop, consider a countertop overlay. Materials like laminate or peel-and-stick vinyl provide a chic appearance without the high cost.
- Add a Backsplash: A backsplash made from inexpensive tiles or even a peel-and-stick tile option can add a stylish element.
Budget Breakdown
| Item | Estimated Cost | Description |
|---|---|---|
| Paint | $20-$30 | Choose a durable, moisture-resistant paint. |
| Hardware (Knobs/Handles) | $10-$50 | Browse for deals at hardware or online stores. |
| Countertop Overlay | $50-$100 | Laminate or vinyl can mimic more expensive materials. |
| Backsplash Tiles | $20-$40 per sq. ft. | Choose between traditional or peel-and-stick tiles. |
| Mirror Frame | $15-$40 | Add a frame to your existing mirror for a polished look. |
Pro Tips for a Seamless Makeover:
- Prep work is key: Make sure to clean and sand surfaces before painting.
- DIY bathroom decor: Personal touches like a handmade mirror frame or DIY shelving add character without high costs.
- Look for sales and discounts: Check out clearance sections and thrift stores for unique pieces at a fraction of the price.
Before Beginning:
- Plan your design and layout.
- Measure your space to buy the correct amount of materials.
- Gather all necessary tools, which typically include a screwdriver, paintbrushes, sandpaper, and a measuring tape.
By following these simple steps and planning your bathroom renovation ideas smartly, you can achieve a remarkable transformation. Whether you want a contemporary look or a classic touch, a budget bathroom makeover is within reach. Embrace your creativity, and enjoy the process of upgrading your space without breaking the bank!

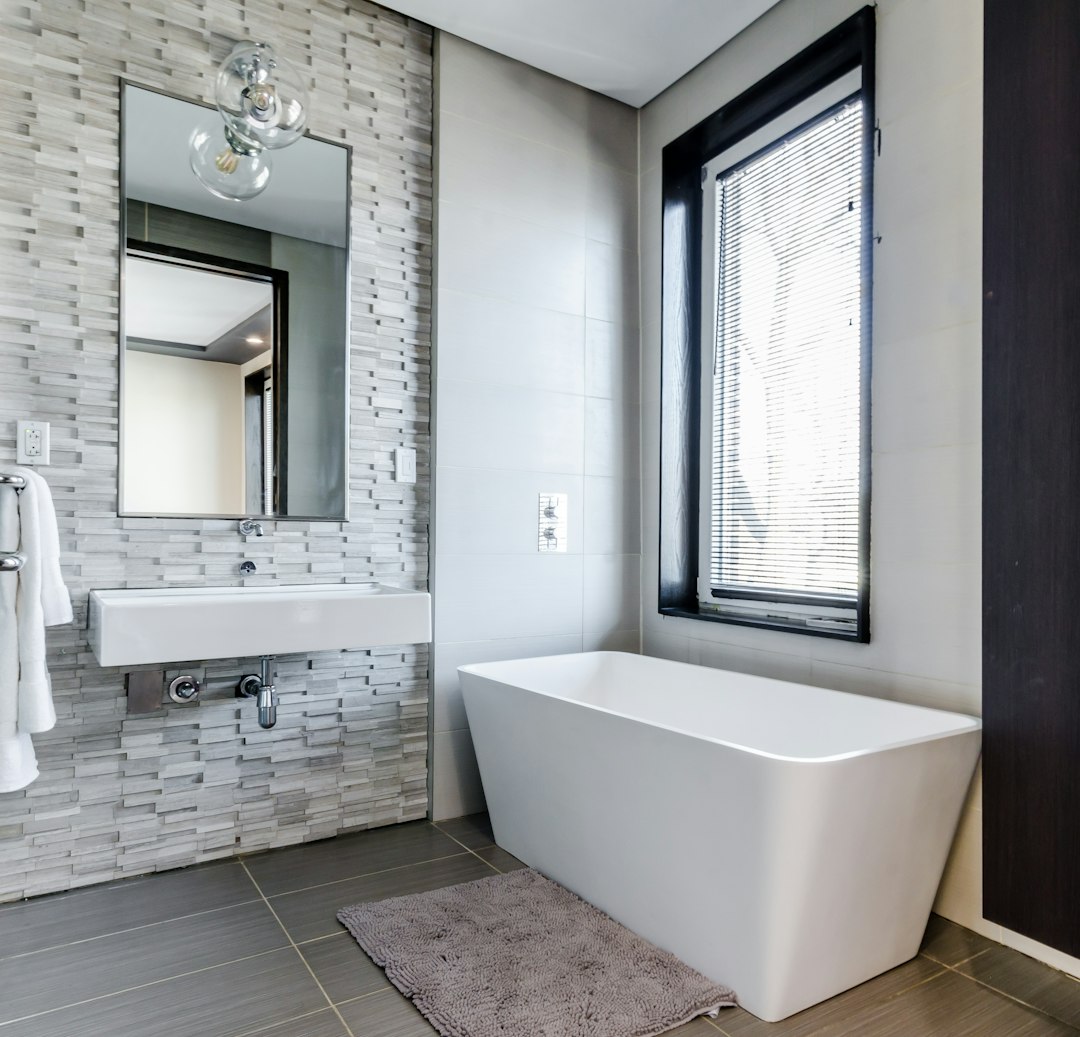
Photo by Jared Rice on Unsplash
DIY Bathroom Lighting Ideas
Effective lighting can transform the look and feel of any bathroom. This section will introduce you to Bathroom renovation ideas focused on lighting that could set a new ambiance, improve functionality, and not break the bank.
Key Considerations:
-
Types of Lighting:
- Ambient Lighting: The overall illumination for your bathroom. Think recessed ceiling lights or a central pendant light.
- Task Lighting: Essential for activities like shaving or applying makeup. Vanity lights or wall-mounted fixtures are ideal.
- Accent Lighting: Highlights specific areas or features, such as under-cabinet lights or LED strips around mirrors.
-
Energy-Efficient Options: Always opt for energy-efficient bulbs like LEDs. They consume less energy, reduce electricity bills, and have a longer lifespan compared to traditional incandescent bulbs.
DIY Project Ideas:
-
Vanity Mirror with Integrated Lights:
- Buy an inexpensive plain mirror.
- Add battery-operated LED strip lights around the frame.
- This upgrade is affordable and offers excellent lighting for daily grooming.
-
Under-cabinet Lighting:
- Use adhesive LED strips under cabinets or shelves.
- Connect them to a plug or opt for USB-powered versions for ease.
-
DIY Pendant Lights:
- Use mason jars, old bowls, or vintage light fixtures.
- Suspend them from the ceiling at different heights for a chic, eclectic look.
Budget Comparison Table:
| Lighting Solution | Estimated Cost | Installation Complexity | Energy Efficiency |
|---|---|---|---|
| LED Vanity Mirror Installation | $30 – $50 | Easy | High |
| Under-Cabinet LED Strips | $20 – $40 | Moderate | High |
| DIY Pendant Lights | $40 – $80 | Moderate | Moderate-High |
Practical Tips:
- Placement: Ensure task lighting is flanking mirrors rather than above to eliminate shadows.
- Dimmer Switches: Adding dimmer switches to your existing lights can provide flexibility and better control over your bathroom’s ambiance.
- Safety First: Always prioritize safe wiring practices or consult with a professional electrician for complex installations.
Whether you’re looking at DIY bathroom decor or a budget bathroom makeover, the right lighting makes a world of difference. Not only does it enhance the overall aesthetic, but it also boosts functionality, making your daily rituals smoother and more enjoyable. Make sure to experiment, have fun, and tailor your choices to fit your unique style and needs.
How to Tile Your Bathroom Floor Like a Pro
Revamping your bathroom floor can significantly elevate the space’s aesthetic and functionality. Whether you’re aiming for a fresh, modern look or classic elegance, tiling your floor is a manageable project with the right approach. Below, we outline a step-by-step guide to tiling your bathroom floor like a pro.
Materials and Tools You’ll Need:
- Tile Cutter
- Tile Adhesive
- Grout and Grout Sealer
- Spacers
- Trowel
- Level
- Measuring Tape
Steps to Follow:
-
Prep the Floor: Ensure the floor is clean, dry, and free from any debris. If necessary, sand down any high spots and fill in any low spots to create a level surface.
-
Layout Planning: Measure your bathroom floor and plan your tile layout. Dry-laying tiles before applying adhesive helps visualize the pattern and minimize cutting.
-
Applying Adhesive: Use a notched trowel to spread tile adhesive evenly across a small section of the floor. Work in sections to avoid the adhesive drying out before you can place the tiles.
-
Laying Tiles: Start from the center and move outwards. Press each tile firmly into the adhesive, and use spacers to keep even gaps between them. Check frequently with a level to ensure the tiles are even.
-
Cutting Tiles: Measure the edges and cut tiles to fit using a tile cutter. Place these trimmed tiles carefully to maintain the pattern.
-
Grouting: Once the adhesive sets (usually 24 hours), remove spacers and apply grout using a rubber float. Ensure grout fills all gaps and wipe off excess with a damp sponge.
-
Sealing: After the grout has dried, apply a grout sealer to protect against moisture and stains.
Tips for Success:
- Ventilation: Ensure proper ventilation in the bathroom during the project to avoid inhaling fumes from adhesives and grout.
- Safety Gear: Always wear gloves, safety glasses, and a mask to protect yourself.
- Consistency: Keep mixing grout and adhesive to a smooth consistency to prevent lumps.
| Task | Time Required | Key Notes |
|---|---|---|
| Floor Preparation | 1-2 hours | Clean and level the floor |
| Layout Planning | 1-2 hours | Dry-lay tiles and plan cuts |
| Applying Adhesive | Varies | Work in small sections |
| Tile Laying | 3-6 hours | Use spacers for even gaps |
| Cutting Tiles | Varies | Measure twice, cut once |
| Grouting | 2 hours | Fully fill gaps and clean excess |
| Sealing | 1 hour | Protect grout from moisture |
Embrace these bathroom renovation ideas to transform your space with professional-level tiling skills. With careful planning and attention to detail, even beginners can achieve stunning results in their next budget bathroom makeover or DIY bathroom decor project.
Updating Bathroom Fixtures on a Budget
Updating bathroom fixtures doesn’t have to break the bank. With the right strategies and a bit of creativity, you can achieve a fresh and modern look without a hefty price tag. Here are some budget bathroom makeover tips to help you get started.
Key Strategies to Update Fixtures
-
Spray Paint Magic:
- Transform outdated hardware like faucets, showerheads, and handles with metallic spray paint.
- Choose colors like brushed nickel, oil-rubbed bronze, or matte black for a contemporary feel.
-
Switch Out Knobs and Pulls:
- Replace old drawer knobs and cabinet pulls with new, stylish ones.
- This small change can make a significant impact.
-
Update Lighting Fixtures:
- Replace dated light fixtures with modern, energy-efficient ones.
- Consider LED options for both style and cost savings.
-
Use Peel and Stick Options:
- Opt for peel-and-stick backsplashes, wallpapers, and tiles for an easy and affordable update.
- These options are perfect for a DIY bathroom decor project.
Comparison of Fixture Update Methods
| Method | Cost | Time Required | Pros | Cons |
|---|---|---|---|---|
| Spray Paint | Low | Moderate | Budget-friendly, customizable, and quick | Requires ventilation, fumes |
| New Knobs/Pulls | Low-Medium | Low | Easy to install, available in various styles | Can be repetitive tasks |
| Lighting Fixtures | Medium | Moderate | Enhances ambiance, energy-efficient options available | May require electrical work |
| Peel and Stick | Low-Medium | Low-Moderate | Easy to apply, removable, and renter-friendly | Limited to adhesive quality |
Tips for a Successful Fixture Update
- Plan Ahead: Determine which fixtures need replacement and measure accurately.
- Set a Budget: Decide how much you’re willing to spend and stick to it.
- Shop Sales and Discounts: Look for sales, clearance items, and discount stores for the best deals.
- DIY When Possible: Many updates can be done without professional help. Use online tutorials for guidance.
By following these strategies and utilizing the right tools and materials, you can achieve a bathroom renovation that’s both stylish and affordable. Plus, these ideas align perfectly with the ethos of DIY bathroom decor—innovative, cost-effective, and personally gratifying.
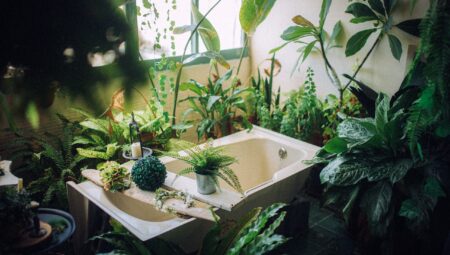
Crafting Your Own DIY Bathroom Decor
Bathroom renovation ideas often go beyond major overhauls and can include personalized touches that truly make a space feel like your own. Ensuring your bathroom decor matches your style and is customized to your preferences can be both satisfying and budget-friendly. Here are several ideas to get you started with your DIY bathroom decor:
Wall Art and Decorative Accents
Creating unique wall art or decorative accents can instantly brighten up your bathroom. Here are a few simple ideas:
- Framed Prints: Use waterproof frames to display favorite quotes or art pieces.
- DIY Mirrors: Add a personal touch to mirrors by decorating the frame with mosaic tiles, paint, or even twine for a rustic look.
Homemade Storage Solutions
Storage in a bathroom can often be limited, but with a few clever tricks, you can maximize your space.
- Decorative Jars: Use mason jars or other decorative containers to store essentials like cotton balls, swabs, and more.
- Floating Shelves: For extra storage, install floating shelves and decorate them with personal items or small plants for both functionality and style.
Upcycled Furniture
Repurposing old furniture is a great budget bathroom makeover idea. Transforming an old dresser into a vanity, for instance, not only saves money but also adds charm and uniqueness to the room.
- Dresser Turned Vanity: Cut out holes for the sink and plumbing to create a standout, functional piece.
- Wooden Ladder Shelves: Repaint an old ladder and use it to hang towels or as shelving for extra storage.
Easy Craft Projects
Sometimes, the simplest projects can have the most significant impact.
- Painted Mason Jars: Paint mason jars in coordinating colors and use them to hold toothbrushes and other bathroom essentials.
- Candle Holders: Craft your candle holders from repurposed materials like small glass jars or metallic holders.
Incorporating these DIY bathroom decor elements not only enhances the aesthetic appeal but also adds a personal, customized touch. It doesn’t have to be expensive or complicated—just a bit of creativity, a few supplies, and some budget bathroom makeover strategies can transform your space into a relaxing oasis.

Maximizing Small Bathroom Spaces
Maximizing small bathroom spaces can seem like a daunting task, but with a bit of clever thinking and creative ideas, you can transform your compact bathroom into a functional and stylish retreat. Here are some practical bathroom renovation ideas to help you make the most out of every square inch.
1. Opt for Vertical Storage
Utilize the height of your bathroom walls to add extra storage. Install shelves or cabinets high up, keeping the floor space clear. Floating shelves are a great option:
- Floating Shelves: Store towels, toiletries, and decorative items without taking up floor space.
2. Use Light Colors and Mirrors
Light colors create an illusion of more space. Combine this with mirrors to reflect light, making your bathroom appear larger.
- Light Colors: Whites, pastels, and light grays.
- Mirrors: Place mirrors opposite windows or light sources for maximum effect.
3. Compact Fixtures
Replace bulky fixtures with compact, wall-mounted versions. This will free up much-needed floor space.
- Wall-Mounted Sinks: Provides more legroom and a cleaner look.
- Compact Toilets: Saves space without sacrificing functionality.
4. Sliding Doors
Consider replacing traditional doors with sliding or pocket doors. These conserve space that swinging doors typically use.
- Barn Doors: Stylish and space-efficient.
- Pocket Doors: Slides into the wall cavity, perfect for tight spaces.
5. Multi-Functional Furniture
Furniture with multiple uses can be a lifesaver in small bathrooms. A vanity that doubles as storage space, for example, can reduce clutter.
- Storage Vanities: Keep items out of sight to maintain a tidy appearance.
- Over-the-Toilet Storage: Utilizes often wasted space above the toilet.
Examples of Budget-Friendly Small Space Solutions
| Solution | Benefits |
|---|---|
| Floating Shelves | Frees up floor space, adds storage |
| Light Colors + Mirrors | Enhances light, creates illusion of space |
| Compact Fixtures | Saves space, retains functionality |
| Sliding Doors | Eliminates swing space usage |
| Multi-Functional Furniture | Reduces clutter, maximizes utility |
Implementing these ideas can turn your small bathroom into a spacious sanctuary. For more DIY bathroom decor and budget bathroom makeover tips, stay tuned to our blog!
Repurposing Furniture for Bathroom Use
Repurposing furniture can give your bathroom a unique and personalized touch without breaking the bank. It’s one of the most creative DIY bathroom decor strategies, especially for those who love a bit of thrifty innovation. Let’s explore some transformative Bathroom renovation ideas using repurposed furniture.
Why Repurpose?
Repurposing furniture not only revitalizes your space but also embraces sustainability. It reduces waste and allows you to create something unique that tells a story.
Furniture Ideas for Your Bathroom
Transforming old furniture can give your bathroom a touch of charm and increased functionality. Here are some ideas:
-
Old Dressers:
- Vanity: Convert an old dresser into a chic bathroom vanity by cutting out spaces for a sink and plumbing.
- Storage: Use drawers for storing toiletries and towels.
-
Ladders:
- Towel Rack: An old ladder can be painted and used as a stylish towel rack.
- Shelf: Attach horizontal planks to the steps to create a rustic shelving unit.
-
Bookshelves:
- Storage Units: Tall bookshelves can be repurposed for storing bathroom essentials like toilet paper, towels, and decor items.
- Niches: Smaller bookshelves can fit perfectly into bathroom corners, maximizing space.
Quick Transformation Tips
Materials You’ll Need:
| Materials | Uses |
|---|---|
| Sandpaper | Prepare surfaces for painting or staining. |
| Paint/Stain | Refresh and customize the look of repurposed pieces. |
| Wood Glue/Fasteners | Secure modifications and ensure stability. |
| Hardware Handles | Add a fresh look with new knobs or pulls. |
| Clear Sealant | Protect furniture from moisture to enhance durability. |
Getting Started
- Inspect and Clean: Ensure the furniture is sturdy and clean any old residue or dust.
- Sand and Prime: Smooth out rough areas and prime the surface for painting.
- Paint or Stain: Choose a color that fits your bathroom theme and apply multiple coats as needed.
- Seal: Apply a clear sealant to protect against moisture damage.
- Add Hardware: Replace old handles and knobs with new, stylish options.
Repurposing furniture is a delightful way to incorporate unique pieces into your home while sticking to a Budget bathroom makeover. These tips show how old furniture, paired with a bit of creativity, can transform your bathroom into a stylish and functional space. Happy renovating!
Maintenance Tips for Your Newly Renovated Bathroom
Once you’ve executed those Bathroom renovation ideas, it’s essential to adopt proper maintenance strategies to keep your hard work looking fresh and new. A well-maintained bathroom not only looks great but also functions more efficiently. Let’s explore some practical tips to preserve your DIY bathroom decor.
Regular Cleaning Routine
Ensuring a consistent cleaning routine is vital:
- Daily Cleaning: Wipe down surfaces, including the sink and countertops, to prevent water spots and soap scum.
- Weekly Cleaning: Scrub the shower, bathtub, and toilet. Use dedicated bathroom cleaners to tackle grime and mold.
- Monthly Deep Clean: Focus on grout lines and hard-to-reach areas. Use a mixture of baking soda and vinegar for an eco-friendly deep clean.
Protecting Surfaces
Different materials need different care:
- Tile and Grout Sealing: Apply a sealant to your newly installed tiles and grout to prevent water penetration and stains.
- Stone Surfaces: Use specific stone cleaners that contain no acidic substances to maintain the shine and prevent etching.
- Glass and Mirrors: Utilize microfibre cloths to avoid streaks and use ammonia-free cleaners to keep them sparkling.
Handling Repairs Promptly
Keep your bathroom in top shape by addressing issues as they arise:
- Leaky Faucets: Fix immediately to prevent water wastage and reduce mineral deposit risks.
- Loose Fixtures: Tighten and secure any loose handles, towel bars, or light fixtures.
Humidity Control
Bathrooms are high-moisture areas, so controlling humidity is crucial:
- Ventilation: Use exhaust fans or open windows to reduce moisture build-up.
- Dehumidifiers: Consider using dehumidifiers in very humid climates or if your bathroom lacks proper ventilation.
Budget Bathroom Makeover Preservation
After a budget bathroom makeover, it’s especially important to maintain your new look:
- Caulking: Inspect and reseal caulk around tubs, showers, and sinks to prevent water damage.
- Paint Touch-ups: Keep leftover paint handy for touch-ups to avoid small nicks and scratches becoming eyesores.
By integrating these maintenance tips into your routine, you ensure that your newly renovated bathroom stays as pristine and functional as the day you completed your project. With careful attention and the right practices, your bathroom oasis will continue to be a space of comfort and style for years to come.
Frequently Asked Questions
What are some easy DIY bathroom projects for beginners?
If you’re new to DIY projects, start with simple tasks like updating cabinet hardware, replacing a faucet, or painting walls. These changes can significantly update the look of your bathroom without requiring specialized skills. Remember to turn off the water supply when changing fixtures to avoid any plumbing mishaps.
How can I update my bathroom without spending a lot of money?
Budget-friendly updates can have a big impact. Consider re-caulking and re-grouting tiles, replacing outdated light fixtures, and adding decorative elements like new shower curtains, rugs, and wall art. You can also upcycle existing furniture or storage items with a fresh coat of paint to give them a new life.
Do I need special tools or equipment for DIY bathroom projects?
For many beginner DIY bathroom projects, basic tools like a screwdriver, wrench, pliers, tape measure, and level will suffice. Depending on your specific project, you might also need a drill, caulking gun, or paintbrushes. Always make sure to read instructions and safety guidelines for any new tools you use.
How do I ensure my DIY bathroom projects are done safely?
Safety is paramount in any DIY project. Always turn off the electricity when working with lighting and ensure the water supply is off when dealing with plumbing fixtures. Wear protective gear like gloves and safety glasses when needed, and follow all manufacturer instructions and safety warnings for tools and materials. If you’re ever unsure about a project, don’t hesitate to consult a professional.