Transforming your outdoor spaces can be both exciting and rewarding, especially when you can bring your vision to life with DIY garden lighting projects. Whether you’re looking to create a serene ambiance or highlight key features in your garden, there are countless outdoor garden lighting ideas that are simple yet impactful. This how-to guide will walk you through various lighting projects for your garden—from solar-powered options and glowing garden rocks to string lights and pathway lanterns. By the end of this post, you’ll have a plethora of choices to enhance your landscape lighting for gardens and make your outdoor area shine. Ready to brighten up your garden? Let’s dive in!
Benefits of DIY Garden Lighting
Investing time and creativity in DIY garden lighting projects not only enhances the beauty of your outdoor space but also brings a myriad of practical benefits. Here are some compelling advantages of taking the DIY route for landscape lighting for gardens:
Cost Savings
One of the most significant benefits is the cost savings. When you opt for DIY garden lighting projects, you eliminate the need for professional installation fees, which can be quite high. Moreover, you have control over the materials and tools you purchase, allowing you to stick to a budget.
Customization and Personalization
Creating your own lighting fixtures gives you the freedom to design elements that match your unique aesthetic and landscaping needs. Whether you’re intrigued by outdoor garden lighting ideas like whimsical fairy lights or elegant lanterns, you can tailor each aspect to fit your personal style.
Sense of Accomplishment
There’s a unique satisfaction that comes from completing a project with your own hands. When you walk through your garden and see it illuminated by lighting fixtures you created, it brings a sense of pride and accomplishment that pre-made solutions simply can’t offer.
Enhanced Safety
A well-lit garden reduces the risk of trips and falls, making your outdoor space safer for you and your guests. Strategic lighting can highlight pathways, steps, and potential hazards.
Increased Property Value
Quality garden lighting not only boosts curb appeal but can also increase the value of your property. Potential buyers often find well-lit landscapes more appealing, making your home more attractive on the market.
Environmental Benefits
Opting for solar-powered lighting projects for garden means you can significantly reduce your carbon footprint. Solar lights use renewable energy, making them an environmentally friendly choice for your outdoor space.
Key Benefits Summary Table
| Benefit | Description |
|---|---|
| Cost Savings | Save on professional fees and control material costs |
| Customization | Design to fit your specific tastes and needs |
| Sense of Accomplishment | Feel proud of your hands-on work |
| Enhanced Safety | Better visibility reduces risks of accidents |
| Increased Property Value | Boost aesthetic and market value |
| Environmental Benefits | Lower carbon footprint with solar options |
Engaging in DIY garden lighting projects brings a sense of personalization, accomplishment, and numerous practical benefits. Explore these advantages and illuminate your garden in a way that reflects your style and meets your functional needs.
Essential Tools and Materials for Outdoor Lighting Projects
When embarking on outdoor garden lighting ideas, ensuring you have the right tools and materials is paramount to a successful installation. Here, we’ll break down everything you need to get started on your DIY garden lighting projects.
Tools You’ll Need
Firstly, gather these essential tools to ensure a smooth and efficient process:
- Wire Strippers: For removing insulation from wires.
- Screwdrivers: Both flat-head and Phillips for various screws.
- Pliers: Useful for gripping and bending wires.
- Drill and Drill Bits: To create holes for mounting lights.
- Measuring Tape: To measure distances accurately.
- Hammer: For pounding stakes or nails into the ground.
- Safety Gear: Gloves and safety glasses to protect yourself.
Materials Required
Alongside the tools, you’ll need specific materials tailored to your landscape lighting for gardens:
| Material | Purpose |
|---|---|
| Outdoor-rated Lights | Weather-resistant lights suitable for garden use |
| Wiring/Cables | Electrical wires designed for outdoor conditions |
| Light Fixtures | Variety of styles including lanterns, string lights, and spotlights |
| Timber/Metal Stakes | Supports for mounting lights |
| Transformers | Convert voltage for low-voltage lighting systems |
| Connectors and Terminals | Secure electrical connections |
| Solar Panels | For solar-powered lighting options for your garden |
Pro Tips for Effective Lighting Installation:
- Plan Your Layout: Sketch a rough layout of where you want to place each light, taking into account the power sources and wiring pathways.
- Measure Twice, Cut Once: Always double-check measurements before cutting wires or drilling holes.
- Test Before Finalizing: Temporarily set up your lights to ensure they illuminate the desired areas before making permanent installations.
- Stay Safe: Make sure your workspace is free from water and remember to turn off the power when working with electrical components.
By preparing the right tools and materials, your lighting projects for garden activities will go smoothly, allowing you to create a magical outdoor space that you and your guests can enjoy. Whether you’re installing string lights or crafting your own lanterns, having a well-equipped toolkit will make your DIY installation a delight. Happy lighting!
Solar-Powered Lighting Options for Your Garden
When it comes to outdoor garden lighting ideas, solar-powered options are not only eco-friendly but also incredibly versatile. Utilizing the endless power of the sun, these lighting solutions can save energy while adding a magical atmosphere to your garden.
Types of Solar-Powered Lights
1. Solar Path Lights
- Purpose: Ideal for illuminating walkways and garden paths.
- Installation: Simply stake them into the ground.
-
Features:
- Equipped with dusk-to-dawn sensors.
- Available in various styles from modern to vintage.
2. Solar String Lights
- Purpose: Perfect for creating a cozy, romantic ambiance.
- Installation: Hang them across pergolas, fences, or trees.
-
Features:
- Rechargeable battery pack.
- Multiple light modes (steady, flashing, etc.).
3. Solar Spotlights
- Purpose: Accent landscape features like statues or flower beds.
- Installation: Ground stakes or wall mounts.
-
Features:
- Adjustable brightness.
- Directional light focus.
How to Choose the Right Solar Lights
Selecting the perfect solar lights involves considering a few key factors:
- Brightness: Measured in lumens; for pathways, 10-30 lumens is suitable, while spotlights may require 100-300 lumens.
- Battery Life: Look for higher battery capacity for longer runtimes.
- Weather Resistance: Ensure your solar lights are waterproof and durable against harsh weather conditions.
- Style and Finish: Match the lights with your garden’s aesthetic.
DIY Installation Tips
Installing solar-powered lighting is simple and requires no wiring. Follow these steps for a hassle-free setup:
- Placement: Ensure the solar panel gets at least 6-8 hours of direct sunlight.
- Assembly: Follow the product-specific assembly instructions.
- Testing: Allow the solar panel to charge fully before first use.
-
Maintenance:
- Regularly clean the solar panels to maximize efficiency.
- Check for obstructions like leaves or dust that might block sunlight.
By integrating these DIY garden lighting projects and focusing on landscape lighting for gardens, you can transform your space into a nighttime paradise. Solar-powered lights provide a sustainable and enchanting way to illuminate your garden, making them a top choice for any garden enthusiast.
Installing String Lights to Enhance Garden Ambiance
Installing string lights is a popular and delightful way to add a magical touch to your garden. These DIY garden lighting projects are perfect for creating a cozy and inviting atmosphere for evening entertaining or simply enjoying your outdoor space. Here’s a step-by-step guide to help you transform your garden into a twinkling oasis.
Step-by-Step Guide to Installing String Lights
-
Plan Your Layout:
- Identify key areas: Pinpoint where you want the lights to go, whether it’s across a patio, along a fence, or wrapped around trees.
- Measure distances: Ensure you have enough string lights to cover your desired area.
-
Choose the Right Lights:
- Opt for outdoor garden lighting ideas designed specifically for outdoor use. Check for weather-resistant and energy-efficient options, such as LED string lights.
-
Gather Essential Tools and Materials:
- Tools: Ladder, drill, screwdriver
- Materials: Hooks, cable ties, extension cords (if necessary)
-
Hang the Lights:
- Secure hooks or mounts: Drill hooks at strategically planned spots.
- String the lights: Draping or wrapping the lights according to your layout plan. Use cable ties to secure them in place.
-
Power Up:
- If your lights are not solar-powered, connect them to a safe power source. Consider using outdoor-rated extension cords if needed.
- For solar-powered lighting options for your garden, place the solar panel in a sunny spot to ensure maximum efficiency.
Tips for Enhancing Ambiance
- Use dimmers: Install dimmer switches to control the brightness.
- Mix and match lighting styles: Combine string lights with landscape lighting for gardens like spotlights and lanterns for varied illumination.
- Experiment with colors: Opt for warm white for a cozy feel or multicolored lights for a festive vibe.
Example Setup (Table)
| Area | Light Type | Installation Tips |
|---|---|---|
| Patio | LED String Lights | Hang along the perimeter and above for a canopy effect. |
| Garden Pathway | Fairy Lights | Wrap around small bushes and along the edge. |
| Fences | Solar String Lights | Attach at the top with hooks, spaced evenly. |
Final Thoughts
Whether you’re celebrating a special occasion or just wanting a serene outdoor retreat, DIY garden lighting projects with string lights are a simple yet effective way to enhance garden ambiance. Follow these steps, get creative, and enjoy a beautifully lit garden all year round.
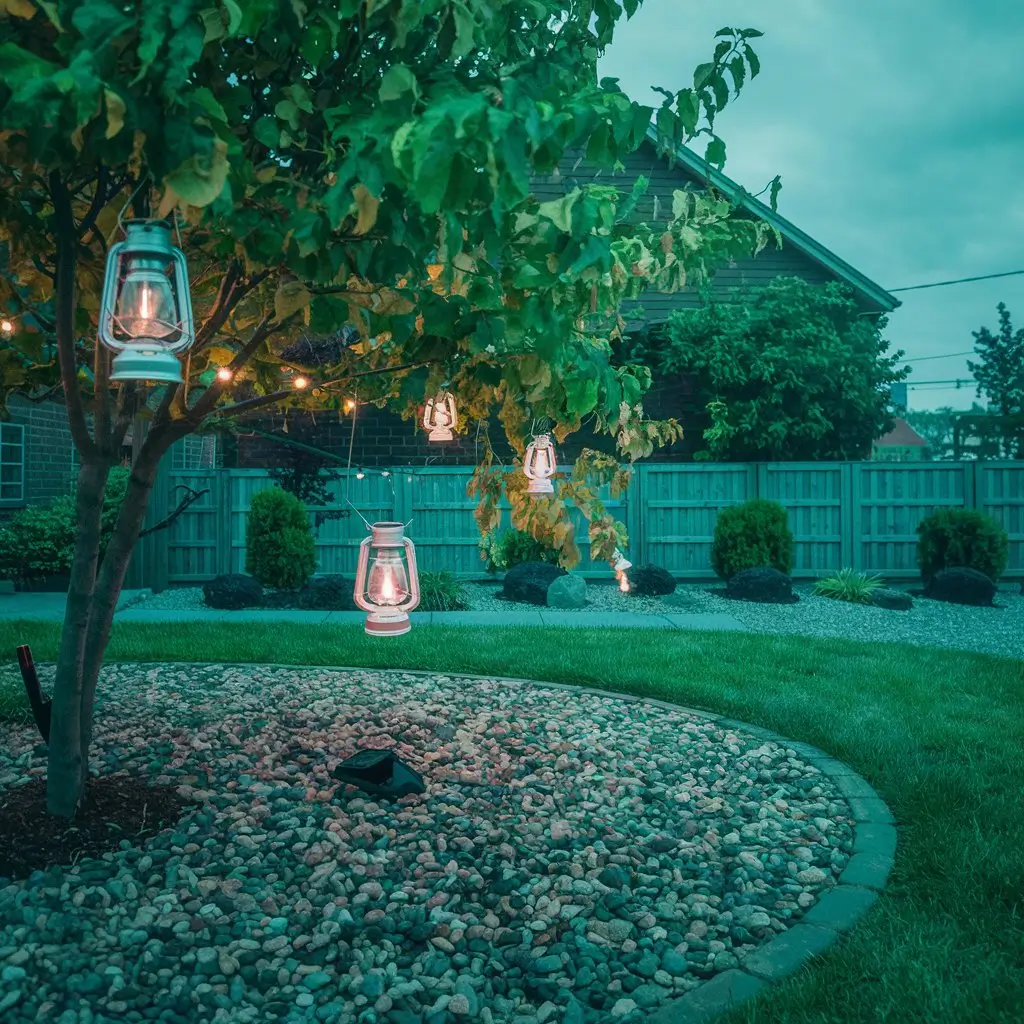
Creating Pathway Lighting with DIY Lanterns
Creating Pathway Lighting with DIY Lanterns is a fantastic project that blends functionality with creative flair. Pathway lighting not only enhances the aesthetic appeal of your garden but also provides safety for nighttime garden strolls. Here’s a step-by-step guide to master the art of DIY garden lighting projects with lanterns.
Materials You Will Need:
- Mason jars or tin cans
- Tea light candles or LED lights
- Solar-powered lights
- Decorative stones or gravel
- Metal hangers or shepherd hooks
- Drill and bits
- String or wire
Step-by-Step Guide:
-
Choose Your Lantern Base: Select mason jars for a rustic feel or tin cans for a more industrial look. Both options make excellent bases for landscape lighting for gardens.
-
Create Ventilation: If using tin cans, drill small holes at the top to allow heat to escape. This is essential when using candles to prevent the lantern from overheating.
-
Add the Light Source: For mason jars, place tea light candles or small LED lights inside. Alternatively, you could opt for solar-powered lighting options for your garden for an eco-friendly touch. Place a small layer of decorative stones or gravel at the bottom for stability and aesthetics.
-
Prepare for Hanging: Use metal hangers or shepherd hooks to suspend your lanterns along the pathway. Drill holes in the mason jar lids for threading the wire or string, and tie securely.
-
Install Your Lanterns: Plot out the walkway and evenly space the lanterns for optimal lighting. Hang them at varying heights to add visual interest.
-
Illuminate and Enjoy: Once set up, illuminate the pathway by lighting the candles or switching on the LED lights. Lighting Projects for Garden pathways have never been easier or more stylish!
| Task | Tools Needed | Key Tips |
|---|---|---|
| Choose Lantern Base | Mason jars, tin cans | Select based on your garden’s theme |
| Create Ventilation | Drill, bits | Essential for heat escape in tin cans |
| Add Light Source | Tea lights, solar lights, gravel | Decorative stones add stability |
| Prepare for Hanging | Metal hangers, wire, string | Drill holes for easy hanging |
| Install Lanterns | Shepherd hooks | Space lanterns evenly along the path |
| Illuminate and Enjoy | Candles or LEDs | Mix heights for visual appeal |
Outdoor garden lighting ideas such as these not only enhance the beauty but also add a personalized touch to your outdoor space. Follow this guide, and you’ll have a stunning, safely lit pathway in no time!
Making Your Own Glowing Garden Rocks
Transforming your garden into an enchanting space doesn’t have to be expensive or complicated. Making Your Own Glowing Garden Rocks is an excellent way to add a magical touch to your garden using simple, accessible materials. This DIY project is not only fun but also a fantastic way to personalize your outdoor landscape.
Materials Needed
To get started on this DIY project, you will need:
- Glow-in-the-dark paint
- Small to medium-sized rocks
- Paintbrushes
- Clear sealant spray
- Protective gloves and newspaper
Step-by-Step Process
1. Gather Your Rocks
- Collect small to medium-sized rocks from your garden or purchase them from a garden center.
- Clean the rocks thoroughly to remove dirt. Use a brush and soapy water if necessary.
2. Prepare Your Workspace
- Lay out newspapers to protect your workspace.
- Wear protective gloves to avoid getting paint on your hands.
3. Apply Glow-in-the-Dark Paint
- Use paintbrushes to apply the glow-in-the-dark paint to your rocks. Cover them evenly for the best effect.
- Apply multiple layers for a more intense glow, letting each layer dry completely as per the manufacturer’s instructions.
4. Seal the Rocks
- Once the paint is dry, use a clear sealant spray to coat your rocks. This will protect the paint from the elements and extend the lifespan of your artwork.
5. Place the Rocks
- Position your glowing rocks strategically around your garden. Popular spots include along pathways, near water features, or scattered among flower beds.
Why Choose Glowing Rocks?
Advantages:
- Cost-Effective: Glowing rocks are cheaper than commercial garden lights.
- Personalized Design: Create unique pieces that match your garden theme.
- Eco-Friendly: No electricity required, making them environmentally friendly.
Lighting Projects for Gardens
Incorporating DIY garden lighting projects enhances your garden’s ambiance and functionality. You can pair glowing rocks with other outdoor garden lighting ideas such as solar-powered lights or DIY candle holders for a well-rounded design. Whether you’re planning lighting for pathways or features, landscape lighting for gardens can effortlessly improve your outdoor space.
Tips for Best Results
- Recharge: Place your glowing rocks in direct sunlight to recharge the glow-in-the-dark paint.
- Use High-Quality Paint: Opt for high-quality glow-in-the-dark paint for a longer-lasting effect.
- Creative Arrangements: Experiment with different rock shapes and paint designs for a unique look.
Embrace your creativity and illuminate your garden space with your own glowing works of art.
Designing a Solar-Powered Water Feature Lighting
Designing solar-powered water feature lighting for your garden can transform your outdoor space into a serene and magical oasis. Whether you have a small pond, a bubbling fountain, or a decorative birdbath, adding lighting can enhance its beauty while making it a focal point during evening hours. Follow these steps for an easy and effective setup.
Materials Needed:
- Solar-powered LED lights
- Waterproof adhesive
- Waterproof solar panel kit
- Timer or light sensor
- Cable ties
- Clear waterproof sealant
Steps to Create Your Project
-
Select Your Water Feature
Identify the water feature you want to illuminate. It could be a pond, fountain, or any other backyard water structure. -
Choose the Solar Lights
Opt for solar-powered LED lights that are specifically designed for underwater use. These lights will not only be energy-efficient but also easy to install since they do not require complex wiring. -
Positioning the Lights
Position the lights in strategic spots where they can best highlight the features of your water element. -
Secure the Lights
Use cable ties and waterproof adhesive to firmly secure the lights. Make sure the lights remain submerged in water. -
Install the Solar Panel
Connect the lights to a waterproof solar panel using the provided cables. Place the solar panel in a sunny location where it can effectively capture sunlight throughout the day. -
Waterproof Connections
Apply clear waterproof sealant to all connections and around the solar panel to ensure they are fully protected from water ingress. -
Set the Timer or Sensor
Use a timer or light sensor to control when the lights turn on and off. This allows for automated, hassle-free operation.
Key Points at a Glance
| Key Aspect | Description |
|---|---|
| Energy Source | Solar-powered, eco-friendly |
| Light Type | Underwater LED lights, illuminating focal points |
| Installation | Easy, minimal wiring required |
| Weather Resistance | Waterproof, suitable for outdoor use |
| Automation | Timer or light sensor for automatic operation |
By incorporating outdoor garden lighting ideas like these, you can enhance the aesthetics of your garden while being environmentally conscious. Not only will you create a compelling visual display, but you’ll also enjoy the soothing ambiance of illuminated water elements. Dive into your DIY garden lighting projects and watch as your garden nightscape transforms!
Using Spotlights to Highlight Garden Features
Spotlights are a powerful way to enhance the beauty of your garden by emphasizing its standout elements. Whether it’s a unique sculpture, a majestic tree, or a charming water feature, properly positioned spotlights can add depth and drama to your outdoor space. Here’s how to effectively use landscape lighting for gardens:
Step-by-Step Guide to Using Spotlights
-
Identify Key Features:
- Start by walking around your garden during the day to identify which features you want to highlight. Choosing a focal point like a fountain, tree, or artistic sculpture will yield the best results.
-
Choose the Right Spotlights:
- Select spotlights that are designed for outdoor use. LED spotlights or energy-efficient options are great choices. Consider solar-powered lighting options for your garden to minimize maintenance and energy costs.
-
Positioning Spotlights:
- Place the spotlight at the base of the feature and angle it upward for a dramatic effect. Experiment with different angles and positions at dusk to see which placement offers the most striking highlight.
-
Use Multiple Spotlights:
- For larger features, use multiple spotlights to avoid harsh shadows and ensure even illumination. Try different combinations until you achieve the desired effect.
Table: Common Garden Features and Spotlight Positioning Tips
| Feature | Positioning Tip |
|---|---|
| Trees | Angle from the base to the canopy, creating an up-lit effect. |
| Statues/Sculptures | Position at base level, adjust to eliminate harsh shadows. |
| Water Features | Use waterproof spotlights, highlight moving water for sparkle. |
| Architectural Elements | Focus light upwards to accentuate lines and textures. |
Additional Tips
- Blend with Ambient Lighting: Integrate spotlights with other lighting elements such as DIY garden lighting projects or outdoor garden lighting ideas to create a cohesive look.
- Consider Light Warmth: Warm white lights often work best for natural features, while cooler tones may highlight modern, sleek elements.
Following these steps and suggestions can turn your garden into an evening showstopper. With thoughtful placement and the right equipment, lighting projects for gardens can bring out the best in your outdoor haven.
Steps to Create DIY Candle Holders for Outdoor Lighting
Creating DIY candle holders can add a touch of elegance and warmth to your garden. Below are step-by-step instructions to craft your own unique candle holders, perfect for any outdoor setting.
Materials Needed
Before diving into the project, gather these essential tools and materials:
- Glass jars or mason jars of various sizes
- Tea light candles or small LED candles
- Twine or decorative wire
- Heat-resistant paint or glass paint
- Paintbrushes and sponges
- Sandpaper (optional)
- Decorative elements such as beads, shells, or stones
- Glue gun and glue sticks
Step-by-Step Instructions
1. Choose and Prepare Your Jars
To start your DIY garden lighting projects, select glass jars that will fit the candles comfortably. Clean the jars thoroughly and remove any labels. For a smoother painting surface, use sandpaper to lightly scuff the jars.
2. Paint and Decorate
Using heat-resistant paint or glass paint, personalize your jars. You can:
- Paint designs or abstract patterns
- Stencil shapes like leaves or flowers
- Sponge technique for a textured look
Allow the paint to dry completely before moving on to the next step.
3. Add Decorative Elements
Adorn your painted jars with decorative wire, wrapping it around the mouth of the jar for a rustic look. You can also use a glue gun to attach beads, shells, or stones around the jar’s exterior, adding unique, charming details.
4. Insert Candles
Place tea light candles or small LED candles inside the jars. For safety and longer-lasting illumination, LED candles are recommended.
5. Position in Garden
Arrange your freshly-made candle holders strategically around your garden. Consider placing them on tables, ledges, or even hanging them from tree branches using twine or decorative wire.
Benefits and Uses
DIY candle holders not only enhance landscape lighting for gardens but also provide a personal touch to your outdoor decor. These are ideal for:
- Garden parties or outdoor dinners
- Creating a cozy atmosphere on patios or decks
- Accentuating specific garden features with soft lighting
Creating your own outdoor candle holders is a rewarding way to add charm and warmth to your garden. This lighting projects for garden enthusiasts ensures a personal touch and enjoyment as you spend time outdoors.
How to Safely Wire Low-Voltage Garden Lights
Properly wiring low-voltage garden lights can transform your outdoor space into a captivating nighttime haven. Here’s a step-by-step guide to get you started.
Materials and Tools Needed:
- Transformer: Regulates voltage output for safety.
- Low-voltage cable: Connects the transformer to the lights.
- Wire connectors: Ensures secure electrical connections.
- Electrical tape: Protects and insulates wire connections.
- Cable cutters: For cutting and stripping wires.
- Safety gloves and goggles: For your protection.
Preparation:
Before you begin, make sure you have all the essential tools and materials. Check that all your DIY garden lighting projects are compatible with low-voltage systems.
Step-by-Step Guide:
-
Install the Transformer:
- Position the transformer near an outdoor electrical outlet.
- Mount the transformer securely following the manufacturer’s instructions.
- Plug the transformer into the outlet and use a GFCI protector for added safety.
-
Lay Out the Low-Voltage Cable:
- Unroll the cable from the transformer to the desired lighting locations, avoiding sharp edges and other hazards.
- Bury the cable at least 4-6 inches deep to prevent accidental damage.
-
Connect the Lights:
- Strip about 1/2 inch of insulation from the ends of the wire where it will connect to the lights.
- Use wire connectors to securely attach the light fixtures to the cable.
- Wrap any exposed wire connections with electrical tape for waterproofing.
-
Test the System:
- Switch on the transformer and ensure all lights operate correctly.
- If a light doesn’t work, check for loose connections or a faulty bulb.
-
Finalize Installation:
- Once everything is working, bury the cable fully and secure the fixtures in place.
- Leave a little slack in the cable to accommodate soil shifts and expansion.
Safety Tips:
- Always wear safety gloves and goggles to protect yourself from electrical hazards.
- Avoid working in wet conditions to prevent electrical shocks.
| Task | Tools Needed | Safety Tips |
|---|---|---|
| Install Transformer | Transformers, brackets | Use GFCI protector for added safety |
| Lay Out Cable | Low-voltage cable, shovel | Bury cable at least 4-6 inches deep |
| Connect the Lights | Wire connectors, cutters | Wrap connections with electrical tape |
| Test and Finalize | Screwdriver | Ensure all connections are waterproof |
By following these steps, you can ensure that your landscape lighting for gardens is both stunning and safe. Enjoy your beautifully illuminated garden!
Incorporating Color-Changing Lights for Dynamic Effects
When it comes to transforming your garden into a captivating night-time sanctuary, landscape lighting for gardens can add layers of interest and drama. One of the most mesmerizing additions you can make is incorporating color-changing lights for dynamic effects. This not only enhances the visual appeal but also creates a versatile ambiance that can be adapted for various occasions.
Key Benefits of Color-Changing Lights:
- Versatility: Suited for garden parties, holidays, and everyday enjoyment.
- Energy Efficiency: Many use LED technology, which consumes less energy.
- Customizable: Change colors and effects to match any event or seasonal theme.
Step-by-Step Guide to Using Color-Changing Lights:
-
Select Your Lights:
- Choose a type: Spotlights, string lights, or floodlights.
- Consider compatibility with any existing lighting system and control options like remote control or a smartphone app.
-
Plan Your Layout:
- Sketch a simple map of your garden, marking the areas you wish to highlight.
- Think about the light distribution and how colors will interact with different plants and structures.
-
Installation:
| Component | Description |
|---|---|
| Lights | Select LEDs for longevity and energy savings |
| Controller | Opt for Wi-Fi or Bluetooth-enabled systems |
| Power Source | Consider solar panels or a traditional outlet |
| Mounting Hardware | Choose weather-resistant options |
-
Programming and Testing:
- Configure the color settings based on your desired ambiance.
- Test the lights at night to ensure they achieve the desired effect and adjust as necessary.
Pro Tips:
- Color Themes: For seasonal celebrations or special events, create preset color themes (e.g., red and green for Christmas, pastels for spring).
- Layering: Combine different lighting types (spotlights on trees and string lights along paths) to create depth and dimension.
- Remote Control: Use a remote or app to easily switch between colors and patterns for real-time customization.
Safety Tips:
- Ensure all electrical connections are weatherproof.
- Avoid overloading circuits by checking the total wattage.
With these simple steps, you can add a dynamic flair to your garden using outdoor garden lighting ideas, specifically color-changing lights. Dive into this exciting DIY garden lighting project and watch your garden come alive with a vibrant palette of colors!
Maintenance Tips for Long-Lasting Garden Lighting
Ensuring your garden lights last long and perform optimally requires regular maintenance. Proper upkeep not only extends the life of your fixtures but also enhances the beauty of your outdoor space. Here are some essential tips for maintaining your garden lighting effectively:
Regular Cleaning
-
Clean Lenses and Fixtures:
- Use mild soap and water to clean the lenses.
- Avoid harsh chemicals that can damage the material.
-
Check for Debris:
- Remove leaves, dirt, and any debris that might accumulate around the fixtures.
Inspect Electrical Connections
-
Examine Wiring:
- Look for frayed or exposed wires.
- Replace any damaged wiring promptly to prevent electrical hazards.
-
Check Connections:
- Ensure all connections are secure and moisture-free.
- Apply waterproof sealant if necessary to protect connections from the elements.
Evaluate Lighting Function
-
Test Lights Regularly:
- Turn on the lights to check for any flickering or dimming.
- Replace burnt-out bulbs with energy-efficient options like LED.
-
Assess Solar-Powered Units:
- Ensure solar panels are clean and exposed to adequate sunlight.
- Replace rechargeable batteries as needed.
Seasonal Adjustments
-
Adjust Fixture Positions:
- During different seasons, plant growth might alter the effectiveness of your lighting.
- Reposition fixtures to maintain optimal lighting.
-
Protect Against Weather:
- In harsh weather conditions, protect your lights with appropriate covers.
- Store removable landscape lighting for gardens safely indoors if possible.
Using a Maintenance Schedule
Maintaining a regular schedule helps to keep track of what needs attention. Here’s an example:
| Maintenance Task | Frequency |
|---|---|
| Clean lenses and fixtures | Monthly |
| Inspect electrical connections | Quarterly |
| Test lights | Monthly |
| Evaluate solar-powered units | Biannually |
| Adjust fixture positions | Seasonally |
By following these maintenance tips, you can ensure that your outdoor garden lighting ideas stay bright and beautiful year-round. Whether you’re working on DIY garden lighting projects or more complex lighting projects for garden, consistent care will make a significant difference in longevity and performance.
Frequently Asked Questions
What are some easy DIY garden lighting projects for beginners?
For beginners, some easy DIY garden lighting projects include solar-powered stake lights, string lights, and lanterns. Solar-powered stake lights are particularly user-friendly as they require no wiring; simply place them in the ground where you need light. String lights can be draped over trees, fences, or gazebos to add a festive touch, while lanterns can be hung from shepherd’s hooks or placed on tabletops to provide soft, ambient lighting.
How do I choose the right type of lighting for my garden?
Choosing the right type of lighting for your garden depends on the purpose you want to achieve. For pathways and borders, low-level stake lights or bollard lights are ideal for guiding the way. For general illumination, opt for floodlights or spotlights that highlight larger areas. Accent lighting can be used to feature specific plants, trees, or garden art. Consider energy-efficient options like solar lights or LED bulbs to save on electricity costs.
Is it necessary to use waterproof lighting fixtures for outdoor projects?
Yes, it is crucial to use waterproof lighting fixtures for outdoor projects to ensure safety and longevity. Outdoor lighting is exposed to the elements, including rain, dew, and varying temperatures. Waterproof fixtures are designed to withstand these conditions and prevent damage to the lighting components. Always check the IP (Ingress Protection) rating to ensure the fixtures are suitable for outdoor use.
Can I install outdoor lighting without electrical skills?
Yes, there are several types of outdoor lighting that can be installed without any electrical skills. Solar-powered lights are a great option as they don’t require wiring and are easy to set up. Battery-operated lights are another alternative that offers flexibility in placement. For those who prefer more permanent lighting solutions but are not comfortable with electrical work, consulting a professional electrician is advisable to ensure safety and proper installation.
